Windows Server Automation (part 2)

Windows automation using PowerShell and AutoIT
Application installation
In Windows automation part 1 we covered the automation for cloud environment and operating system. In this blog post, we are going to cover automation for the application installation.
The application in question communicates with external third parties for analytics and monitoring purposes.
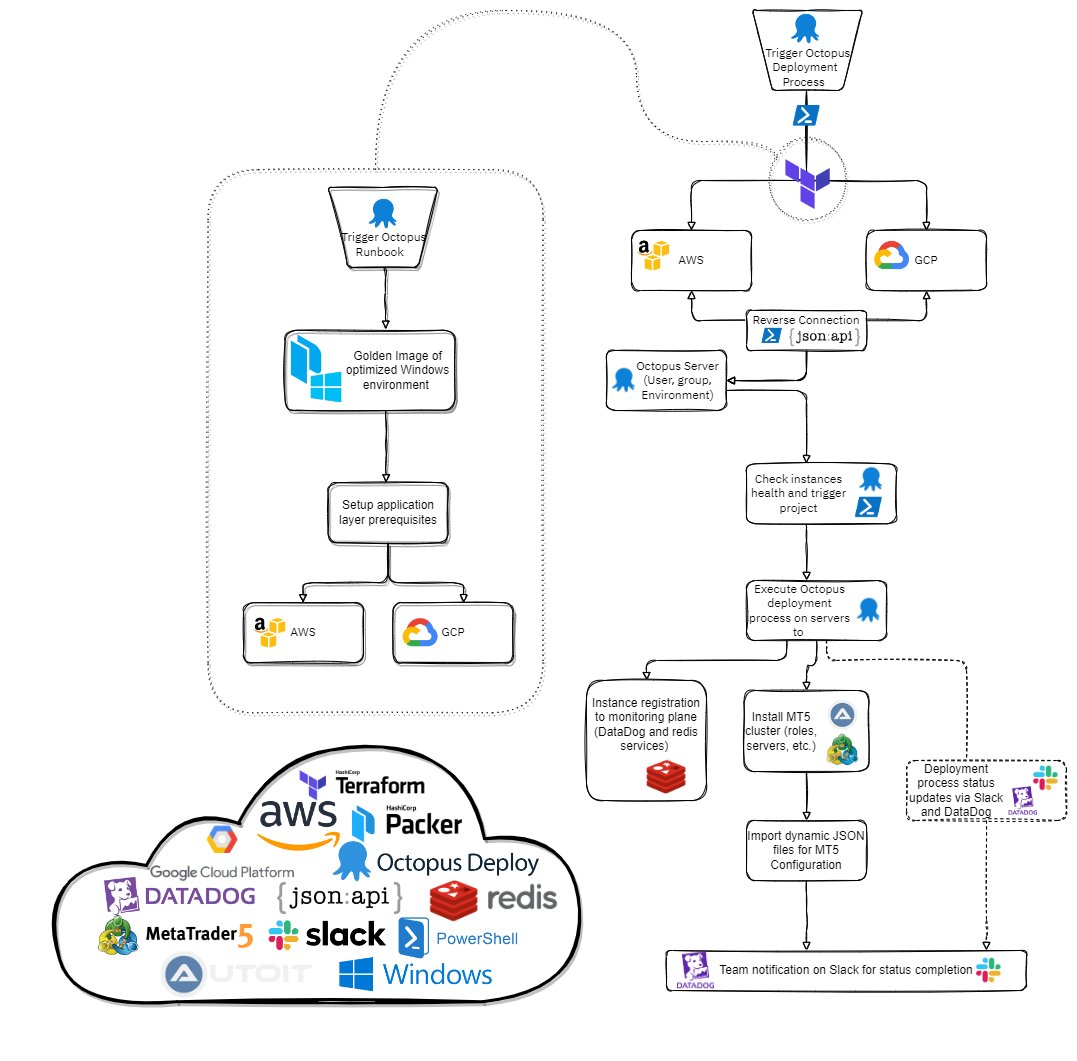
Adding again the diagram from part 1 blog that explains the flow and interaction between the components involved:
Firstly, we gathered all the software requirements needed for installing the application.
The challenge here was to install and set up the additional services required for the entire application structure. This was done via Octopus Deploy using PowerShell and Python scripts that interacted with the instances and installed and configured all additional services.
Secondly, we installed the application according to the role of the Windows instance using Octopus. In addition, we had a few required application plugins to automate as well.
In order to monitor the entire automation process, we established checkpoints within the Octopus Deploy server. These checkpoints were configured to send a payload, including information about the process progress, via a webhook to our chat platform for instance reporting.
Automatic application installation using interactive sessions
The next step was to automate the application installation required on the different deployed instances.
This is straightforward in cases where the Windows application to be installed is in a .msi format, where there is an option for the application to be installed in the background via a command line interface.
However, when it comes to .exe applications, which usually do not offer the option of background installation without a user interface, we need to employ a third-party application and its corresponding programming language, AutoIT (a freeware programming language developed by AutoIt Consulting Ltd).
As shown in the example below, we basically identified various components within the user interface window of the application during the installation process via instance IDs, and we interacted with them using AutoIT.
For each window of the installation process, we needed to select the correct button or text box and interact with them according to the action needed by sending the commands to the interface.
The timing of the command execution is crucial since the automatic interactions need to be sent at the right time when the window is available or when the installation process of the previous interaction is done.
AutoIT script sample
#include <MsgBoxConstants.au3>
Run("C:\ntp-4.2.8p15-v2-win32-setup.exe")
$Text = ControlGetText("Network Time Protocol Setup ","","[CLASS:Button; INSTANCE:2]")
WinWait("Network Time Protocol Setup ",$Text)
WinActivate("Network Time Protocol Setup ",$Text)
ControlCommand("Network Time Protocol Setup ",$Text,"[CLASS:Button; INSTANCE:2]","Check")

$Text2 = ControlGetText("Network Time Protocol Setup ","","[CLASS:Static; INSTANCE:10]")
WinWait("Network Time Protocol Setup ",$Text2)
WinActivate("Network Time Protocol Setup ",$Text2)
ControlCommand("Network Time Protocol Setup ",$Text2,"[CLASS:Button; INSTANCE:2]","Check")

$Text3 = ControlGetText("Network Time Protocol Setup ","","[CLASS:Static; INSTANCE:10]")
WinWait("Network Time Protocol Setup ",$Text3)
WinActivate("Network Time Protocol Setup ",$Text3)
ControlCommand("Network Time Protocol Setup ",$Text3,"[CLASS:Button; INSTANCE:2]","Check")

WinWaitActive ( "Network Time Protocol Setup: Configuration Options", "Please specify your configuration settings" )
ControlCommand("Network Time Protocol Setup: Configuration Options","Please specify your configuration settings","[CLASS:Button; INSTANCE:2]","Check")

WinWaitActive ( "Network Time Protocol Setup", "No pool server and no other server specified." )
ControlCommand("Network Time Protocol Setup","No pool server and no other server specified.","[CLASS:Button; INSTANCE:1]","Check")

WinWaitActive ( "Network Time Protocol Setup", "Do you want to review the generated config file (to check it or apply additional settings)?" )
ControlCommand("Network Time Protocol Setup","Do you want to review the generated config file (to check it or apply additional settings)?","[CLASS:Button; INSTANCE:2]","Check")

WinWaitActive ( "Network Time Protocol Setup: NTP Service Options", "Please specify your service settings" )
ControlCommand("Network Time Protocol Setup: NTP Service Options", "Please specify your service settings","[CLASS:Button; INSTANCE:2]","Check")

WinWaitActive ( "Network Time Protocol Setup ", "Completing the Network Time Protocol Setup Wizard" )
ControlCommand("Network Time Protocol Setup ", "Completing the Network Time Protocol Setup Wizard" ,"[CLASS:Button; INSTANCE:2]","Check")
The above code snippet was used to install the NTP application on one of our windows' hosts.
As indicated in the code block, for every installation window of the process, we need to specify the title of the window (which is usually the same for all windows of the interfaces within the installation) and also the subtitle.
The reason for narrowing down the details of each window was to provide specific guidance on the automation process to wait (using winwaitactive) for the appropriate window to be available. As soon as the window was available, the next step was to identify the elements of that window which we need to be interacted with.
Using the command ControlCommand, we provide the information for the correct box, and we define the action that needs to be performed on that button.
As shown above, "[CLASS:Button; INSTANCE:2]","Check", is the command to check the button with the Instance ID equal to 2.
Following the successful completion of the installation wizard, we were able to install the NTP and all the necessary Windows applications, on our Windows terminals without any human intervention.
Dynamic parameters
Each server needed to be configured depending on the application role. In order to customize the configuration of the server roles, we created a JSON file using PowerShell.
We used dynamic parameters to make it easier for the user to give the right details according to the configuration needed. The DynamicParam can take an if statement and, depending on the user’s input, accordingly add additional parameters.
[CmdletBinding(DefaultParameterSetName = 'mainparams')]
param (

    [ValidateSet("security","time","groups","plugins","network")]
    [string[]]$Config,
    $serverRole
)
DynamicParam
{
    if ($config -eq “Network”)
  {

    $parameterAttribute = [System.Management.Automation.ParameterAttribute]@{
        ParameterSetName = "NameToGroupParameters"
        Mandatory = $true
    }

    $attributeCollection = [System.Collections.ObjectModel.Collection[System.Attribute]]::new()
    $attributeCollection.Add($parameterAttribute)

    $paramDictionary = [System.Management.Automation.RuntimeDefinedParameterDictionary]::new()

        $dynParam1 = [System.Management.Automation.RuntimeDefinedParameter]::new(
            ‘ParamName1’, [string], $attributeCollection
        )
        $dynParam2 = [System.Management.Automation.RuntimeDefinedParameter]::new(
            ‘ParamName2’, [string], $attributeCollection
        )


        $paramDictionary.Add(‘ParamName1’,$dynParam1)
        $paramDictionary.Add(‘ParamName2’,$dynParam2)

        return $paramDictionary

     }elseif($config -eq “Feeder”)
  {

    $parameterAttribute = [System.Management.Automation.ParameterAttribute]@{
        ParameterSetName = "NameToGroupParameters"
        Mandatory = $true
    }

    $attributeCollection = [System.Collections.ObjectModel.Collection[System.Attribute]]::new()
    $attributeCollection.Add($parameterAttribute)

    $paramDictionary = [System.Management.Automation.RuntimeDefinedParameterDictionary]::new()

        $dynParam3 = [System.Management.Automation.RuntimeDefinedParameter]::new(
            ‘ParamName3’, [string], $attributeCollection
        )
        $dynParam4 = [System.Management.Automation.RuntimeDefinedParameter]::new(
            ‘ParamName4’, [string], $attributeCollection
        )

        $paramDictionary.Add(‘ParamName3’,$dynParam3)
        $paramDictionary.Add(‘ParamName4’,$dynParam4)

        return $paramDictionary
 }
}
As per the code sample above, you can add some additional parameters so that the user will have it populated in the CLI when executing the script without missing any parameters. These additional parameters are being declared within the appropriate if statement inside the function as:
 $paramDictionary.Add('serverName',$dynParam1)
        $paramDictionary.Add('serverId',$dynParam2)
        $paramDictionary.Add('privateIPs',$dynParam3)
        $paramDictionary.Add('publicIPs',$dynParam4)
        $paramDictionary.Add('serverip', $dynParam5)
        return $paramDictionary
For the additional parameters to work properly we need to declare $parameterAttribute, $attributeCollection and $paramDictionary.
For the $parameterAttribute variable, it will hold the specific attributes for the new parameters. Thus, if there are different attributes for the new parameters, we need to declare more than one attribute. For example:
    $parameterAttribute = [System.Management.Automation.ParameterAttribute]@{
        ParameterSetName = "Network"
        Mandatory = $true
    }

    $parameterAttribute1 = [System.Management.Automation.ParameterAttribute]@{
        Mandatory = $False
    }
In this example, the first attribute shows two things: the ParameterSetName and the Mandatory switch (true or false). In this case, we had a new parameter that did not belong to the ParameterSetName, nor was Mandatory, which was why we added $parameterAttribute1. Following this, we had to create an attribute collection to add to the parameters and finally to create and return in what we call the parameter dictionary. As per the attribute example, since we had two different attributes, we needed two collections, as shown below:
    $attributeCollection = [System.Collections.ObjectModel.Collection[System.Attribute]]::new()
    $attributeCollection.Add($parameterAttribute)

    $attributeCollection1 = [System.Collections.ObjectModel.Collection[System.Attribute]]::new()
    $attributeCollection1.Add($parameterAttribute1)
We then declared the dictionary itself, added each parameter, and assigned the right collection.
   $paramDictionary = [System.Management.Automation.RuntimeDefinedParameterDictionary]::new()

$dynParam1 = [System.Management.Automation.RuntimeDefinedParameter]::new(
            'NewParameterName1', [string], $attributeCollection
        )
$dynParam2 = [System.Management.Automation.RuntimeDefinedParameter]::new(
            'NewParameterName2', [string], $attributeCollection1
        )
In this case, $dynParam1 will be necessary with the parameter set name “Network”, whilst $dynParam2 will have no restrictions whatsoever and can be skipped. Finally, to return the new parameters, we need to add them to the dictionary. To do this, we just add them as below:
       $paramDictionary.Add('NewParameterName1',$dynParam1)
       $paramDictionary.Add('NewParameterName2',$dynParam2)
       return $paramDictionary
Moreover, we import specifically tailored configurations using dynamic JSON files developed within PowerShell. To do this, a function was used within the script that constructed the JSON configuration according to parameters.
This was done mostly by concatenating the changing parts of the JSON configuration according to the server type, changing IP, etc.
The only hiccup included certain values that needed to be matched with the current server configuration. In this case, we were working on a default installation, for which values might change on additional servers.
To overcome this, the configuration is exported before the JSON creation script is triggered and within the script, we Get-Content of the file with the last modified date within the export path, putting this data in a variable to manipulate it just like a JSON payload from an API.
    #Defining the path
    $exportPath = "C:\somepath\Exports\"
    #Get most recent modified file
    $exportLastFile = Get-ChildItem 'C:\somepath\Exports'  | Sort {$_.LastWriteTime} | select -last 1
    #create the Literal path of the file
    $exportFile = "$exportPath$($exportLastFile.Name)"

    #Get the JSON file content in $log
    $log = (Get-Content $exportFile)

    #trim file and Convert To JSON
    $log = ($log[(0)..($log.length-5)]) + ($log[($log.length-4)..($log.length)]).replace(',','') | convertfrom-JSON

    #Get the needed server filtering with parameter values
    $server = $log.server.ConfigNetwork | Where-Object {$_.Type -eq $type -and $_.Login -eq $serverid}
From the last line of the script, we filtered the JSON file using the parameters $type and $serverid given by the user to get the right server details, calling them later in the following manner depending on the information the JSON file holds.
 $global:networkJSON += '"Name" : "'+$server.name+'",
        "Address" : "'+$server.Ipaddress+':'+$server.port+'",
        }
Stay tuned for our next blog post, which discusses cloud-agnostic implementation using Terraform and PowerShell.