Windows Server Automation (part 1)

Windows automation using Terraform and Octopus Deploy
At Deriv, we have integrated the MetaTrader 5 platform (MT5), based on Windows, to provide our clients with advanced trading options.
It was fine to handle the deployment manually when we had a limited number of servers required to manage the platform.
With the increase in popularity, due to Deriv's competitive MT5 offerings, we quickly realised that developing our large-scale applications and keeping them alive involved numerous steps.
As the number of steps increased, so did the complexity, which led to a higher risk of missing or misconfiguring something.
Currently, we have 50+ cloud servers instance on AWS for handling various parts of the MT5 platform.
Automation is the solution
The need to automate the entire process becomes particularly vital when you have a SLA of 99.99% and when you have a fleet of this many servers on cloud infrastructure.
With manual intervention, there is a higher likelihood of errors, missed configuration steps, and other flaws. Therefore, automation also helps with increasing operational reliability.
The task at hand
The task presented here as a good case study for Windows automation to set up multiple cloud instances and prepare the environment for a third-party Windows application.
We also needed cloud environment configurations regarding network access and connectivity between instances, as well as users' role-based access controls.
Yet another requirement was to integrate the application with multiple peripheral services, including monitoring and analytics.
The below diagram explains the flow and interaction between the components involved:
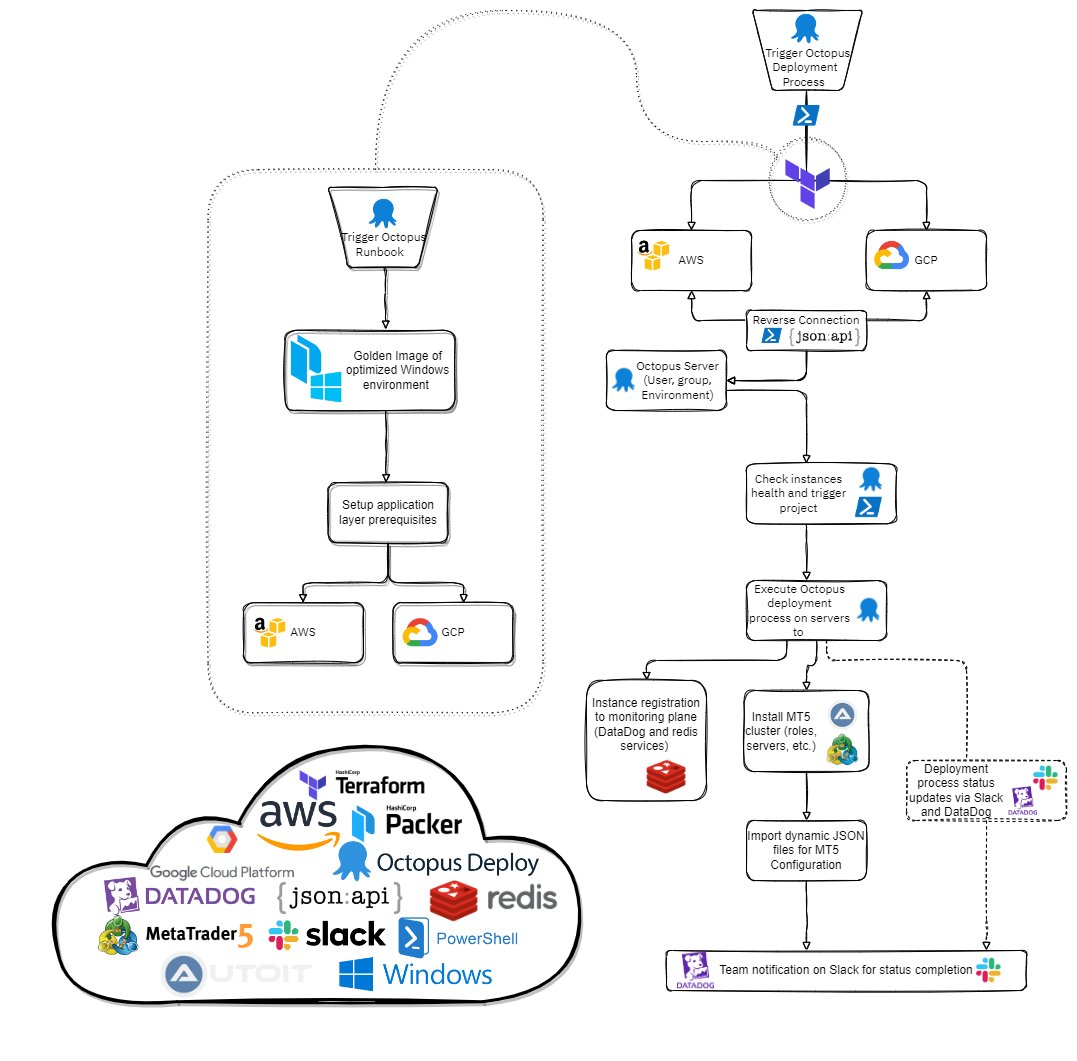
In addition, we want to be cloud agnostic as an organisation at Deriv. To fulfil this goal, our deployment had to cater to both AWS and GCP.
How to get there?
The plan was to implement a CI/CD pipeline that would support the Windows ecosystem, and specifically an automation mechanism that would allow the deployment and uninterrupted operation of the required Windows setup.
More than meets the eye
We figured out that this challenge had multiple layers needing analysis and automation, such as the cloud environment, OS, and application installation. In this blog post, we’re going to discuss the cloud environment layer in detail.
Cloud environment
We decided to use Terraform for provisioning the cloud instances. We started by gathering all of our application’s machine requirements. Once the resource and operational requirements for each machine role were gathered, we coded them as Infrastructure as Code (IaC) using Terraform.
The main principle used during the process was resource implementation (later referred to as modules) for every new instance we wanted to deploy. Shifting away from a monolithic architecture, applying microservices flexibility was the main target during Terraform implementation.
By creating modules, we were no longer pressed to programmatically define multiple resources using repeated parts of the code; instead, it was enough to define the main resource and create modules wherever required.
The resources created were not only about the EC2 instances but also about networking, network whitelisting, Security Groups, VPCs, NACL, etc.
An appropriate communication channel was also created to allow communication between different regions using VPC peering.
Terraform practical illustration
We wanted to use AWS as our cloud provider and opted to go with Octopus Deploy Server as our configuration manager.
We defined the two providers required to provision and configure both AWS and Octopus Deploy Server with Terraform:
- AWS
- Octopus Deploy
Configuring Terraform providers
terraform {
  required_version = "~> 1.0.0"
  required_providers {
    aws = {
      source  = "hashicorp/aws"
      version = "~> 3.0"
    }
    octopusdeploy = {
      source = "OctopusDeployLabs/octopusdeploy"
    }
  }
}
For the Terraform code, We used GitHub as our Version Control System platform. For the first part of the provisioning process, our Terraform module pulled the corresponding resources from the GitHub repo to initiate the AWS instances.
The same concept is followed for the provisioning of the VPC, subnets, and all the networking components.
module "database-server" {
  source         = "[email protected]:andreas-deriv/example"
  aws_region     = var.aws_region
  instance_count = 1
  name           = "DB"
  ami_id         = "windows-base-2019"
  instance_type  = "m5.large"
  subnet_id      = data.aws_subnet.subnet[0].id
  availability_zone           = var.availability_zone
  associate_public_ip_address = true
  associate_eip               = true
  get_password_data           = true
  key_name                    = aws_key_pair.example.id
  vpc_security_group_ids      = ["${aws_security_group.example.id}"]
  user_data                   = file("../powershell_scripts/user-data.ps1")
}
The last line in the above code sample triggers the required user data snippet, which enables and configures the Windows Remote Management (WinRM) connection using the bash command and adding and enabling the firewall rules using the PowerShell script. With the WinRM protocol enabled, we are able to remotely connect, via terminal, to the Windows instance.
WinRM bash & PowerShell snippet
// Execute batch script to enable Windows Remote Management and allow unencrypted traffic with basic authentication
<script>
  winrm quickconfig -q & winrm set winrm/config @{MaxTimeoutms="2200000"} & winrm set winrm/config/service @{AllowUnencrypted="true"} & winrm set winrm/config/service/auth @{Basic="true"}
</script>

// Execute PowerShell script to add firewall rules and allow Windows Remote Management protocol on port 5985
<powershell>
  netsh advfirewall firewall add rule name="WinRM in" protocol=TCP dir=in profile=any localport=5985 remoteip=any localip=any action=allow
</powershell>
For each newly created instance, the password was exported using the private key file. The same password was added as a variable on the Octopus Deploy Server, using the Octopus Deploy resource given below:
database_password_base64 = base64encode(rsadecrypt(module.database-server.encrypted_password_data, file(var.private_key_path)))
Each password was pulled using the private key file for the AWS account and later on encoded to base64 for integrity reasons, to avoid issues with escape characters.
The next step was to manage Terraform integration with the Octopus Deploy Server to automate the transition. That's why we used null resources whose purpose was to execute a PowerShell script on the host.
resource "null_resource" "run_tentacle_script_on_db" {
  depends_on = [module.database-server]

  provisioner "remote-exec" {
    connection {
      host     = module.access-server.elastic_ip
      type     = "winrm"
      user     = "administrator"
      password = rsadecrypt(module.database-server.encrypted_password_data,file(var.private_key_path))
    }
    inline = ["powershell C:\\tentacle.ps1"]
  }
}
Since Terraform cannot be controlled on the sequence of execution, we took special care to add the dependencies in the correct order. In that respect, the null resources were executed, provided that the provisioning of the instance was finished already.
During the execution of the null resources, the PowerShell script was executed on the host, which automatically installed and registered the Tentacle agent on the newly created instance. The process was executed via API call towards our already prepared Octopus Deploy Server, hosted on our management plane on AWS.
We used the suitable corresponding resources to configure the Octopus Deploy Server via Terraform modules. By creating new users and their roles, team, different environments, new project group, new projects, and a new space, we configured the Octopus Deploy Server.
One of the most useful resources that we used was the variable creation resource.
module "variable1" {
  source       = "./ODvariables"
  name         = "${aws_instance.database-server.tags.Name}_PrivateIP"
  value        = "${module.database-server.elastic_ip}"
  description  = "This is Database’s server public IP."
  type         = "String"
  project_id   = module.project_creation.id
  roles        = ["Database", "Monitoring"]
  environments = [module.environment.id]
}
Using this resource, we managed to register on the Octopus Deploy Server all the public and private IP addresses, the hostnames, and the passwords of the newly created instances. The same variables were later on called within the processes running in Octopus Deploy.
Operating System
We gathered all Operating System (OS) prerequisites for the application to configure using PowerShell Scripts. The operational requirements were gathered, for the application to work on each instance. The requirements were tested initially to optimize the resource allocation within the Windows OS.
Every OS configuration was done using PowerShell snippets until all required optimization steps were completed. The final outcome of this step was a holistic PowerShell script that disabled all the unnecessary processes (that are not needed by the application to run), and cleared up the bloatware from the Windows environment.
To be continued
Stay tuned for the next blog, which describes automation steps using PowerShell and AutoIT.
References
- Windows Remote Management (WinRM)
- PowerShell documentation
- Octopus Deploy repository for listening tentacle registration via API.
- Terraform Octopus provider Octopus Deploy provider
- Terraform AWS provider AWS provider
Intrigued?
Head over to our careers page to be part of our team at Deriv and make an impact.