Implementing High-Availability Cross-Cloud VPN between AWS and GCP
As part of our effort to become cloud-agnostic, we are moving a section of our production services to GCP from AWS while most of our services and databases continue to run on the AWS infrastructure.
Throughout this campaign, keeping our services away from the public network has been one of our main security concerns. Thus, our solution to handle the traffic privately was to create a VPN tunnel between GCP and AWS using the IPSec protocol to secure the communication channel.
In our previous blog post, we described how we fixed the NAT Gateway issue in a site-to-site VPN between GCP and AWS. Here, we shall explain in more detail how we designed and implemented the connection using the Border Gateway Protocol.
Site-to-site VPN connection
The key concepts used on AWS to peer with GCP fall into two groups. First, we have the key concepts for the site-to-site VPN used on AWS:
- VPN connection: A secure connection between other clouds and the VPCs on AWS
- VPN tunnel: An encrypted link where data can pass from the other network to or from AWS
- Customer gateway: An AWS resource that provides information to AWS about your gateway device. In our case, it's a peer GCP VPN gateway. GCP Cloud VPN gateways are associated with this gateway on AWS.
- Virtual private gateway: The VPN endpoint on the Amazon side of our site-to-site VPN connection is to be attached to a single VPC
And then, there are the key concepts used on the GCP end to peer with AWS:
- Cloud Router: Fully distributed and managed Google Cloud service to provide dynamic routing using BGP for your VPC networks
- Cloud NAT: A Google service that lets certain resources without external IPs create outbound connections to the internet
- Cloud VPN gateway: A Google-managed VPN gateway running on Google Cloud. Each Cloud VPN gateway is a regional resource that has one or two interfaces. We made use of two interfaces, each with its own external IP addresses: interface 0 and 1. Each Cloud VPN gateway is connected to a peer VPN gateway. AWS tunnels public IPs are associated with this gateway.
- Peer VPN gateway: A gateway connected to a Cloud VPN gateway. All the tunnels at the GCP end use this gateway. Each tunnel should have one external IP.
- Cloud VPN tunnels: A VPN tunnel connects two VPN gateways (AWS and GCP) and serves as virtual tunnels through which encrypted traffic passes
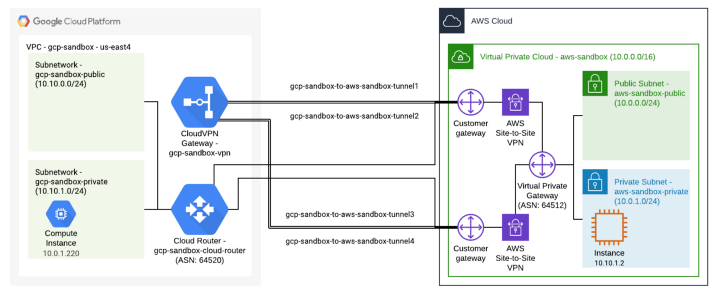
GCP has two types of VPN gateways, Classic and High Availability (HA). We will be creating the HA version of the VPN gateway, which allows us to achieve 99.99% SLA. In addition to this gateway, we must create 4 tunnels between AWS and GCP. On the AWS side, we will need to create two customer gateways and two site-to-site VPN connections.
We will be jumping between GCP and AWS consoles in this tutorial.
GCP
Step 1: Create a Cloud Router
-
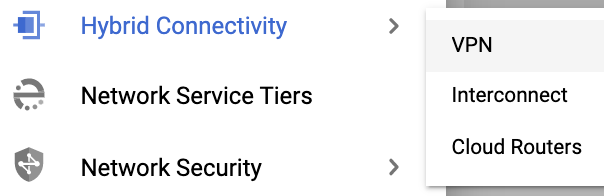
Scroll down to Hybrid Connectivity and select “Cloud Routers”. Click “Create Router”.
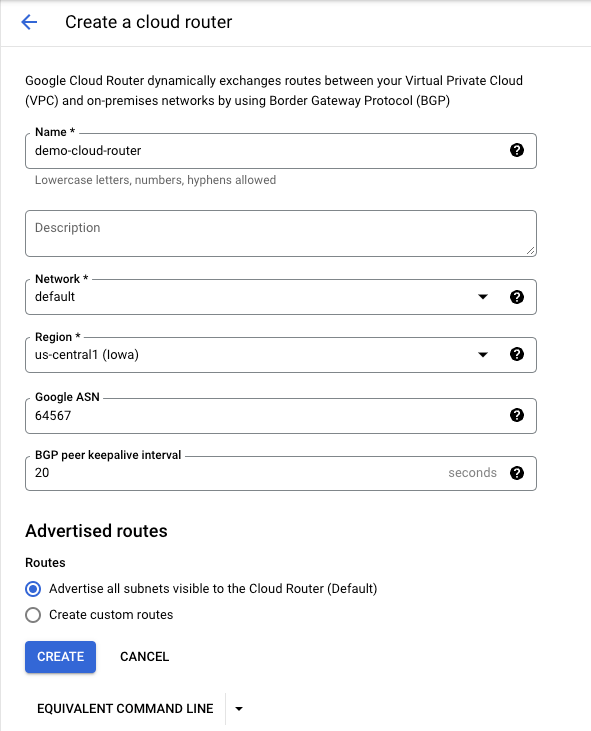
When creating the Cloud Router, the following details are important: -
Name: demo-cloud-router
-
Google ASN: 64567 (You can use any private ASN within the range 64512–65534. Make sure it doesn’t conflict with the ASN in the AWS side created later in Step 5 (This will be used in Step4).
-
*Note: 4200000000–4294967294 are not allowed in AWS, so don’t use this range.
-
BGP peer keepalive interval: 20 (Default)
-
Select “Advertise all subnets visible to the Cloud Router (Default)”
Step 2: Create a VPN
- Go down to Hybrid Connectivity, select "CREATE VPN CONNECTION"
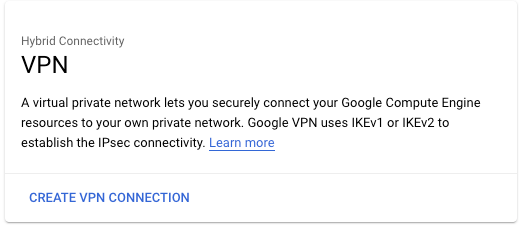
- Select "High-availability (HA) VPN".

Step 3: Create a Cloud HA VPN gateway
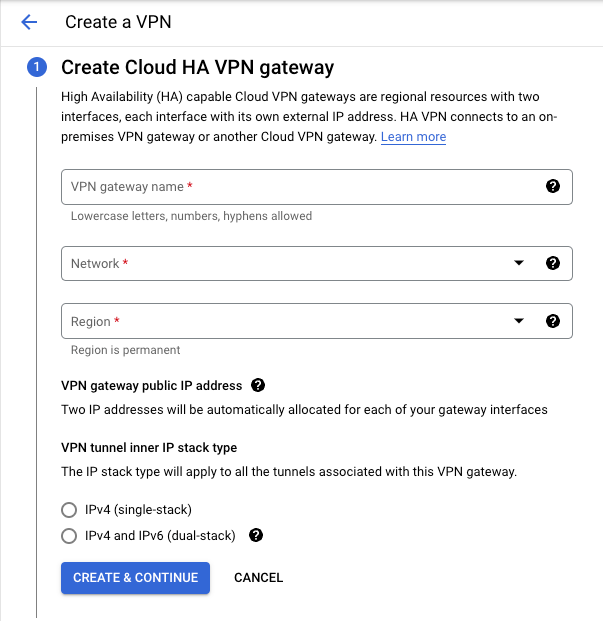
- Add "VPN gateway name".
- Select "Network".
- Select "Region" for your VPN.
- Select "IPv4 (single-stack)" for the VPN tunnel inner IP stack type.
- Create and continue.
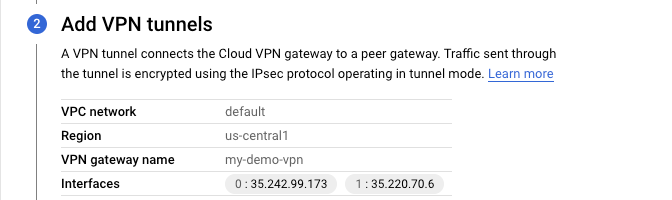
- Make sure to note down the interfaces created in the below step “0 : 35.242.99.173 1 : 35.220.70.6"
Step 4a: Switch to AWS and create Customer Gateway 1
- Go to the VPC section in AWS and look for "Virtual private network (VPN)".
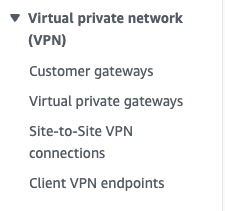
- Select "Customer gateways" and select "Create customer gateway".
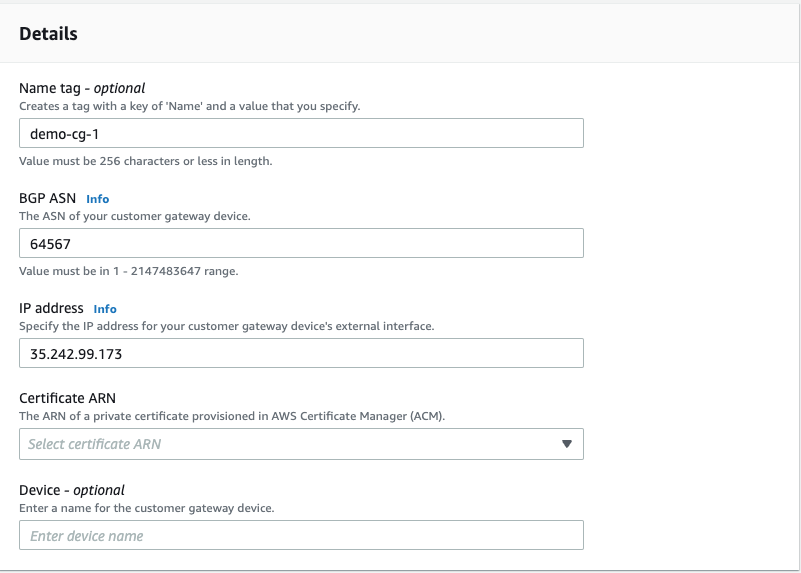
- Name: demo-cg-1
- BGP ASN: 64567 (the ASN you used to create the GCP Cloud Router in Step 1)
- IP Address: 35.242.99.173 (IP from Interface Tunnel 0 in GCP VPN Gateway in Step 3)
- Certificate ARN: blank
- Device: blank
Step 4b: Repeat Step 4a to create Customer Gateway 2
- We have to create 2 customer gateways to accommodate 4 tunnels between AWS and GCP
- Name: demo-cg-2
- BGP ASN: 64567 (The ASN you used to create the GCP Cloud Router in Step 1)
- IP address: 35.220.70.6 (IP from Interface Tunnel 1 in the GCP VPN gateway in Step 3)
- Certificate ARN: blank
- Device: blank

Step 5: Create virtual private gateways
- Select "Virtual private gateways"; then select "Create virtual private gateways".
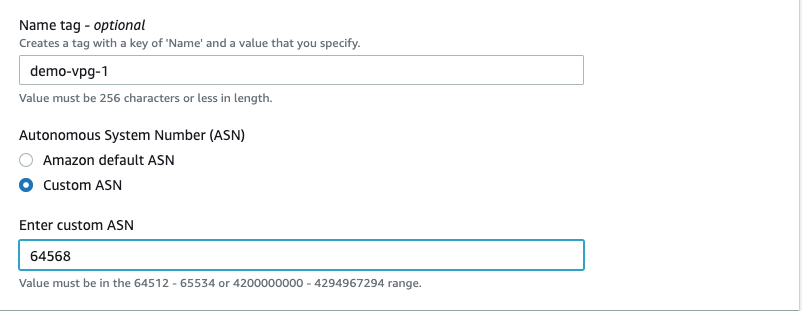
- Name tag: demo-vpg-1
- ASN: Custom ASN: 64586 (Any ASN you want. This will be used on the GCP side in Step13)

- You will notice that "State" shows Detached, We have to attach this VPG to a VPC.
Step 6: Attach the virtual private gateway (VPG) to VPC
- Select the newly created VPG, go to Actions, and select Attach to VPC.

- Select the VPC you want to attach to the VPG.
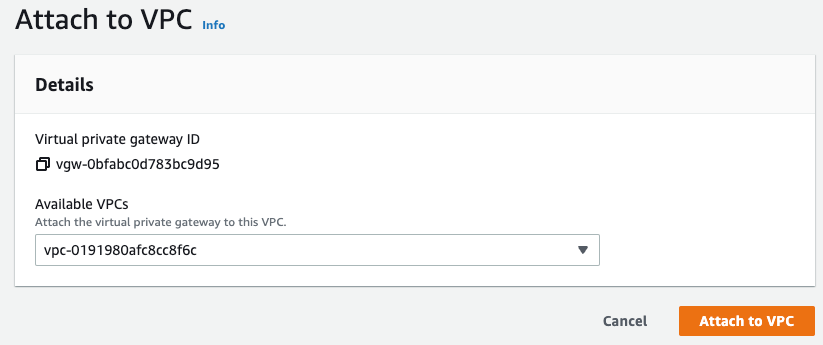
Note: There can only be one VPG attached to a VPC, so if a VPG already exists in your VPC, you can attach your customer gateways to that same existing VPG.
Step 7a: Create a site-to-site VPN connection (Tunnel 0)
- Select "Site-to-Site VPN connections"; then select "Create VPN connection".
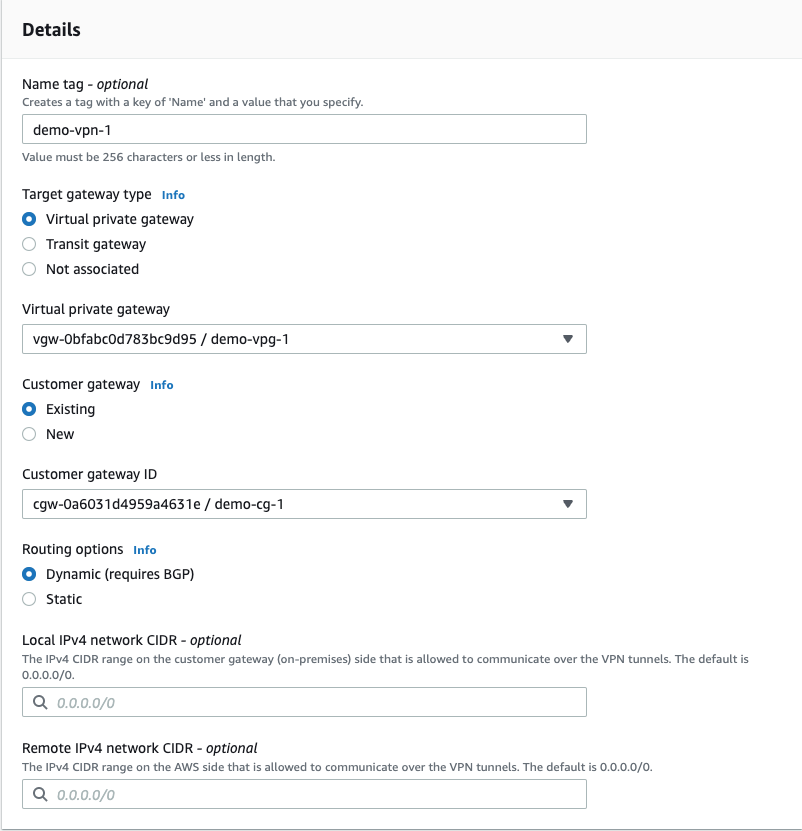
- Name tag: demo-vpn-1
- Target gateway type: Virtual Private Gateway
- Virtual private gateway: vgw-0bfabc0d783bc9d95 (name tag: demo-vpg-1). Select the virtual private gateway you just created.
- Customer gateway: Existing
- Customer gateway: cgw-0a6031d4959a4631e (name tag: demo-cg-1). Select the first customer gateway you created that matches Tunnel 0 in GCP.
- Routing options: Dynamic
Step 7b: Repeat Step 7a to create another site-to-site VPN connection (Tunnel 1)
- Name tag: demo-vpn-2
- Target gateway type: Virtual Private Gateway
- Virtual private gateway: vgw-0bfabc0d783bc9d95 (name tag: demo-vpg-1). Select the virtual private gateway you just created.
- Customer gateway: Existing
- Customer gateway: cgw-0e74d3786ff8eb0e9 (name tag: demo-cg-2). Select the first customer gateway you created that matches Tunnel 1 in GCP.
- Routing options: Dynamic
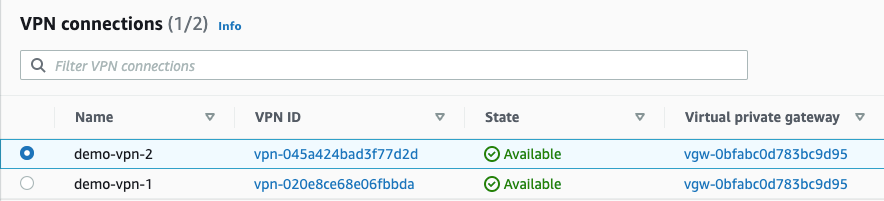
Step 8a: Download the configuration of the VPN-1 connection
- Select the new site-to-site VPN connection (demo-vpn-1). Click “Download configuration”.
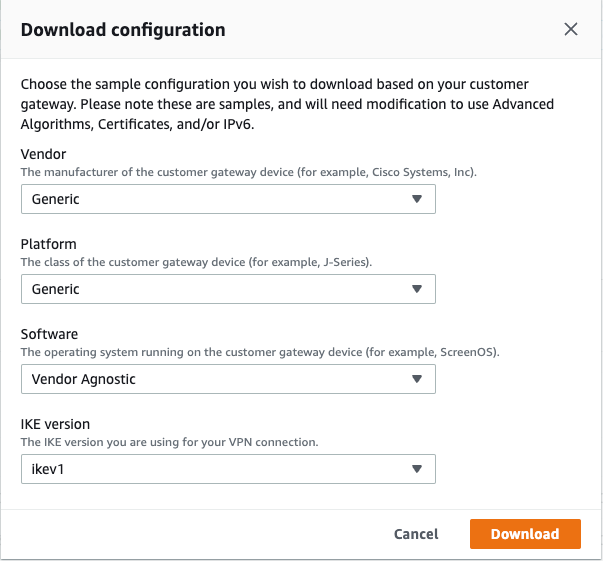
- Vendor: Generic
- Platform: Generic
- Software: Vendor Agnostic
- IKE version: ikev1
- Click "Download" to save the configuration and use it later while setting up GCP.
Step 8b: Repeat Step 8a to download the configuration of the VPN-2 connection
- Select the new site-to-site VPN connection (demo-vpn-2). Click “Download configuration”.
- Vendor: Generic
- Platform: Generic
- Software: Vendor Agnostic
- IKE version: ikev1
- Click "Download" to save the configuration and use it later while setting up GCP.
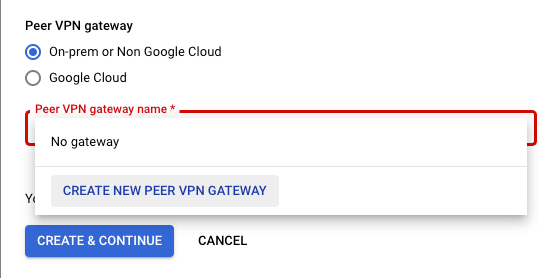
Step 9: Switch back to GCP to Step 3
- For “Peer VPN gateway”, make sure “On-prem or Non Google Cloud” is selected.
- For “Peer VPN gateway name”, click the drop-down menu and select “Create new peer VPN Gateway”.
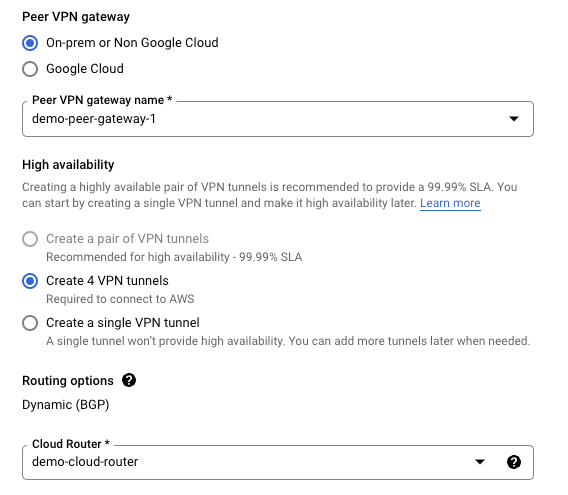
- Name: demo-peer-gateway-1
- Interfaces: Select “four interfaces”
Step 10a: Open the first configuration file you downloaded from AWS
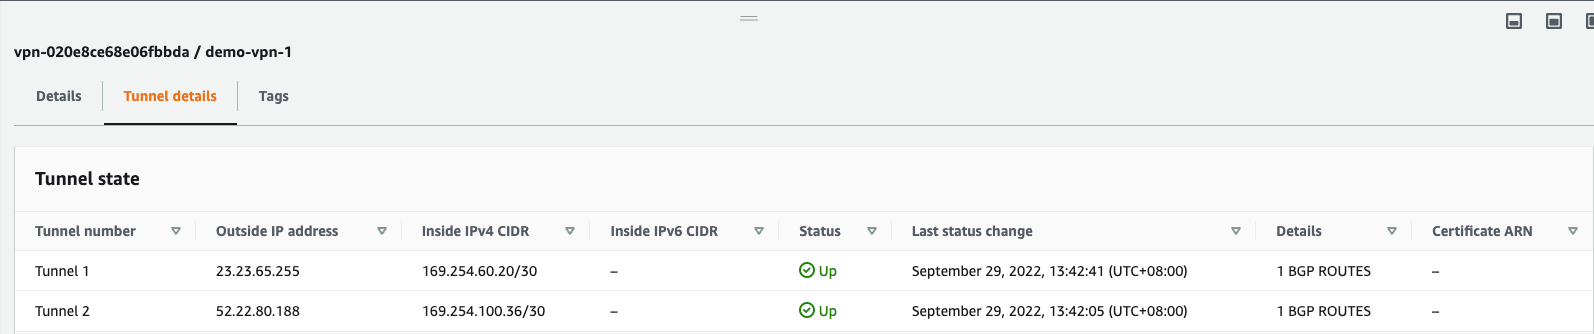
- Interface 0 IP address: 23.23.65.255 (Look for “IPSec Tunnel #1” -> “#3: Tunnel Interface Configuration” -> “Outside IP Addresses:” -> Virtual Private Gateway.)

- Interface 1 IP Address: 52.22.80.188 (Look for “IPSec Tunnel #2” -> “#3: Tunnel Interface Configuration” -> “Outside IP Addresses:” -> Virtual Private Gateway.)

Step 10b: Open the second configuration file you downloaded from AWS
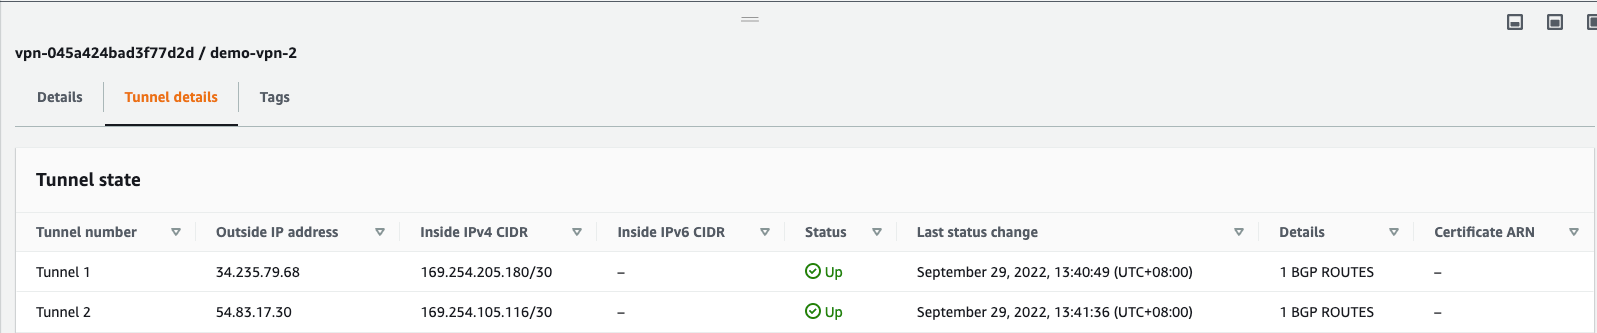
- Interface 3 IP address: 34.235.79.68 (Look for “IPSec Tunnel #1” -> “#3: Tunnel Interface Configuration” -> “Outside IP Addresses:” -> Virtual Private Gateway.)

- Interface 4 IP address: 54.83.17.30 (Look for “IPSec Tunnel #1” -> “#3: Tunnel Interface Configuration” -> “Outside IP Addresses:” -> Virtual Private Gateway.)

- Add the above value in Step 9.

Step 11: Attach the Cloud Router created in Step 1
- Select "Create 4 VPN tunnels".
- Add the name of the cloud router created in Step1 ("demo-peer-gateway-1").
Step 12a: Configure the VPN (Tunnel 1)
- Associated Cloud VPN gateway interface: “0 : 35.242.99.173”
- Associated peer VPN gateway interface: “0 : 23.23.65.255”
- Name: demo-vpn-tunnel-1
- Description:
- IKE version: IKEv1
- IKE pre-shared key: pUXYaBBHqrwt5fT3zcJ1RFdwpMg5T2Ie (Look in the first configuration file you downloaded under “IPSec Tunnel #1” -> “#1: Internet Key Exchange Configuration” -> “- Pre-Shared Key”)


Step 12b: Configure the VPN (Tunnel 2)
- Associated Cloud VPN gateway interface: “0 : 35.242.99.173”
- Associated peer VPN gateway interface: “0 : 52.22.80.188”
- Name: demo-vpn-tunnel-2
- Description: demo-vpn-tunnel-2
- IKE version: IKEv1
- IKE pre-shared key: HeFwR_SmRsZf0WCaKGoFuDSixvXGcbCf (Look in the first configuration file you downloaded under “IPSec Tunnel #1” -> “#1: Internet Key Exchange Configuration” -> “- Pre-Shared Key”)

Step 12c: Configure the VPN (Tunnel 3)
- Associated Cloud VPN gateway interface: “0 : 35.242.99.173”
- Associated peer VPN gateway interface: “0 : 34.235.79.68”
- Name: demo-vpn-tunnel-3
- Description: demo-vpn-tunnel-3
- IKE version: IKEv1
- IKE pre-shared key: JjfmK0HcxGx4sTidWx5cHTvnVKq_oXU7 (Look in the first configuration file you downloaded under “IPSec Tunnel #1” -> “#1: Internet Key Exchange Configuration” -> “- Pre-Shared Key”)

Step 12d: Configure the VPN (Tunnel 4)
- Associated Cloud VPN gateway interface: “0 : 35.242.99.173”
- Associated peer VPN gateway interface: “0 : 54.83.17.30”
- Name: demo-vpn-tunnel-4
- Description: demo-vpn-tunnel-4
- IKE version: IKEv1
- IKE pre-shared key: R1ROQKVBCxVCZrV9Dtg5W6vCBD.3jzq4 (Look in the first configuration file you downloaded under “IPSec Tunnel #1” -> “#1: Internet Key Exchange Configuration” -> “- Pre-Shared Key”)

Step 13a: Configure BGP Sessions (Tunnel 1)
- You should be able to see the following screen.
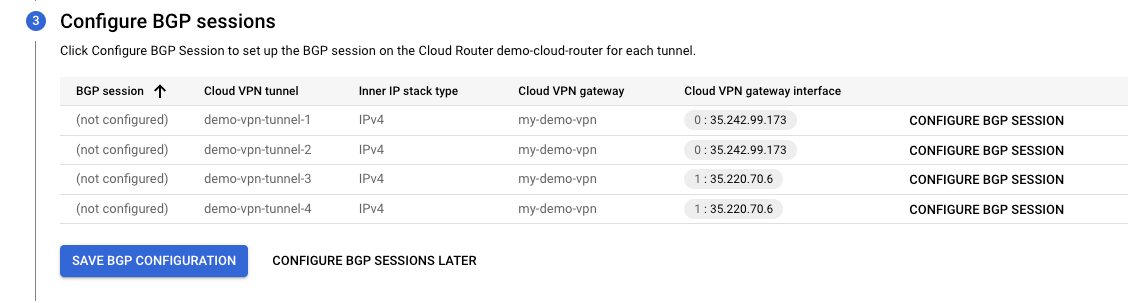
- Click “Configure BGP Session” for demo-vpn-tunnel-1.
- Name: demo-bgp-1
- Peer ASN: 64568 (The ASN from the Virtual Private Gateway from AWS)
- Advertised route priority (MED): blank
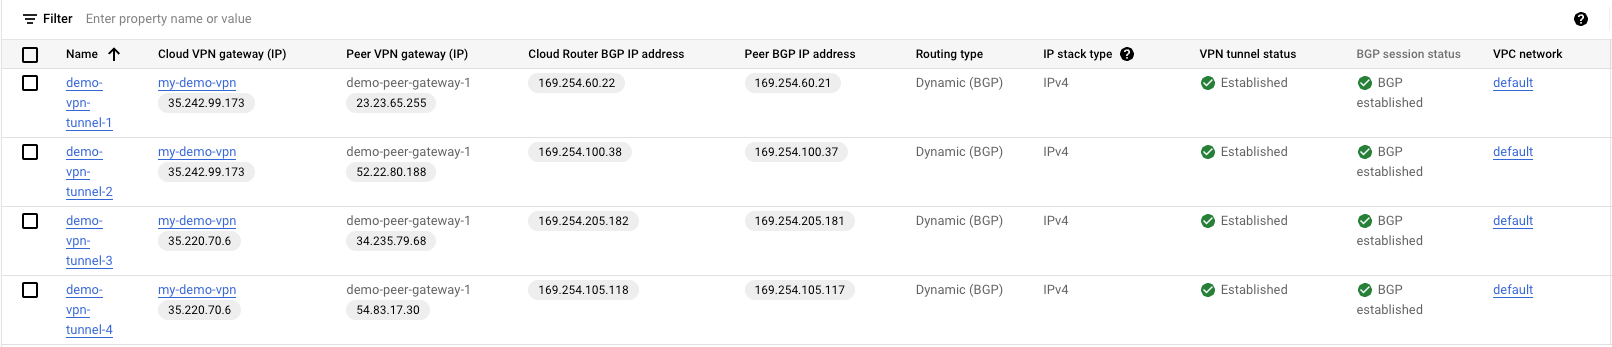
- Cloud Router BGP IP: 169.254.60.22 (Look for “IPSec Tunnel #1” -> “#3: Tunnel Interface Configuration” -> “Inside IP Addresses:” -> Customer Gateway)
- BGP peer IP: 169.254.60.21 (Look for “IPSec Tunnel #1” -> “#3: Tunnel Interface Configuration” -> “Inside IP Addresses:” -> Virtual Private Gateway)
- Select “Use Cloud Router’s advertisements (Default)”.


Step 13b: Configure BGP Sessions (Tunnel 2)
- Click “Configure BGP Session” on demo-vpn-tunnel-2.
- Name: demo-bgp-2
- Peer ASN: 64568 (The ASN from the Virtual Private Gateway from AWS)
- Advertised route priority (MED): blank
- Cloud Router BGP IP: 169.254.100.38 (Look for “IPSec Tunnel #1” -> “#3: Tunnel Interface Configuration” -> “Inside IP Addresses:” -> Customer Gateway)
- BGP peer IP: 169.254.100.37 (Look for “IPSec Tunnel #1” -> “#3: Tunnel Interface Configuration” -> “Inside IP Addresses:” -> Virtual Private Gateway)
- Select “Use Cloud Router’s advertisements (Default)”.

Step 13c: Configure BGP Sessions (Tunnel 3)
- Click “Configure BGP Session” on demo-vpn-tunnel-3.
- Name: demo-bgp-3
- Peer ASN: 64568 (The ASN from the Virtual Private Gateway from AWS)
- Advertised route priority (MED): blank
- Cloud Router BGP IP: 169.254.205.182 (Look for “IPSec Tunnel #1” -> “#3: Tunnel Interface Configuration” -> “Inside IP Addresses:” -> Customer Gateway)
- BGP peer IP: 169.254.205.181 (Look for “IPSec Tunnel #1” -> “#3: Tunnel Interface Configuration” -> “Inside IP Addresses:” -> Virtual Private Gateway)
- Select “Use Cloud Router’s advertisements (Default)”.

Step 13d: Configure BGP Sessions (Tunnel 4)
- Click “Configure BGP Session” on demo-vpn-tunnel-4.
- Name: demo-bgp-4
- Peer ASN: 64568 (The ASN from the Virtual Private Gateway from AWS)
- Advertised route priority (MED): blank
- Cloud Router BGP IP: 169.254.105.118 (Look for “IPSec Tunnel #1” -> “#3: Tunnel Interface Configuration” -> “Inside IP Addresses:” -> Customer Gateway)
- BGP peer IP: 169.254.105.117 (Look for “IPSec Tunnel #1” -> “#3: Tunnel Interface Configuration” -> “Inside IP Addresses:” -> Virtual Private Gateway)
- Select “Use Cloud Router’s advertisements (Default)”.

- After configuring the BGP Session, It should look something as following:

- Click on "Save BGP Configuration".
On the GCP side
On the AWS side
Step 14: Adding Routes from GCP into AWS
- Select the VPC in which you created the VPN.
- Click on “Route Tables” in the left nav bar. Select the routeing table associated with your VPC.
- Click on the “Route Propagation” tab.
- Click on “Edit route propagation”

- When you click on the “Routes” tab, you should now see the 10.128.0.0/20 GCP CIDR range add to the table automatically.

This Will finish our setup of HA site-to-site VPN, cross-cloud networking with high availability is an involved process with many components, and requires considerable effort to stay on top. This tutorial aims to be a hands-on manual to give you an understanding of different components. Creating this HA site-to-site VPN requires individual cloud CLIs, e.g. gcloud and aws-cli, or IAC tools, such as Terraform.