Cloud-agnostic Kubernetes on AWS: A strategic guide

Remember the days of endless server maintenance? Late nights spent troubleshooting crashes and praying nothing breaks during peak traffic? We've all been there. These constant battles with infrastructure instability fueled our search for a more scalable and resilient solution.
This quest led us to a fun project to explore the world of Kubernetes, a container orchestration platform that promised to streamline application management and deployment. While our initial experience brought its own set of challenges, the valuable lessons learned paved the way for a smoother transition to using AWS EKS (Amazon Elastic Kubernetes Service).
In this blog post, we'll tell you about our adventure with Kubernetes, focusing on overcoming common challenges and maximising the benefits of a multi-cloud strategy.
Cloud-agnostic Kubernetes: Benefits and challenges
As we started transitioning to Kubernetes, we faced a key challenge in creating a cloud-agnostic environment: maintaining consistency and functionality across different cloud providers.
We thoroughly reviewed different tools and decided on K3s.io for its qualities:
- Lightweight: K3s has minimal resource requirements and is consistently updated, making it suitable for various cloud environments.
- Simple: K3s offers a straightforward yet secure installation process compared to full-fledged Kubernetes setups.
- Open-source: The open-source nature of K3s avoids dependence on any specific cloud provider's tooling. It also matches our commitment to openness and community-driven progress.
How to install K3s
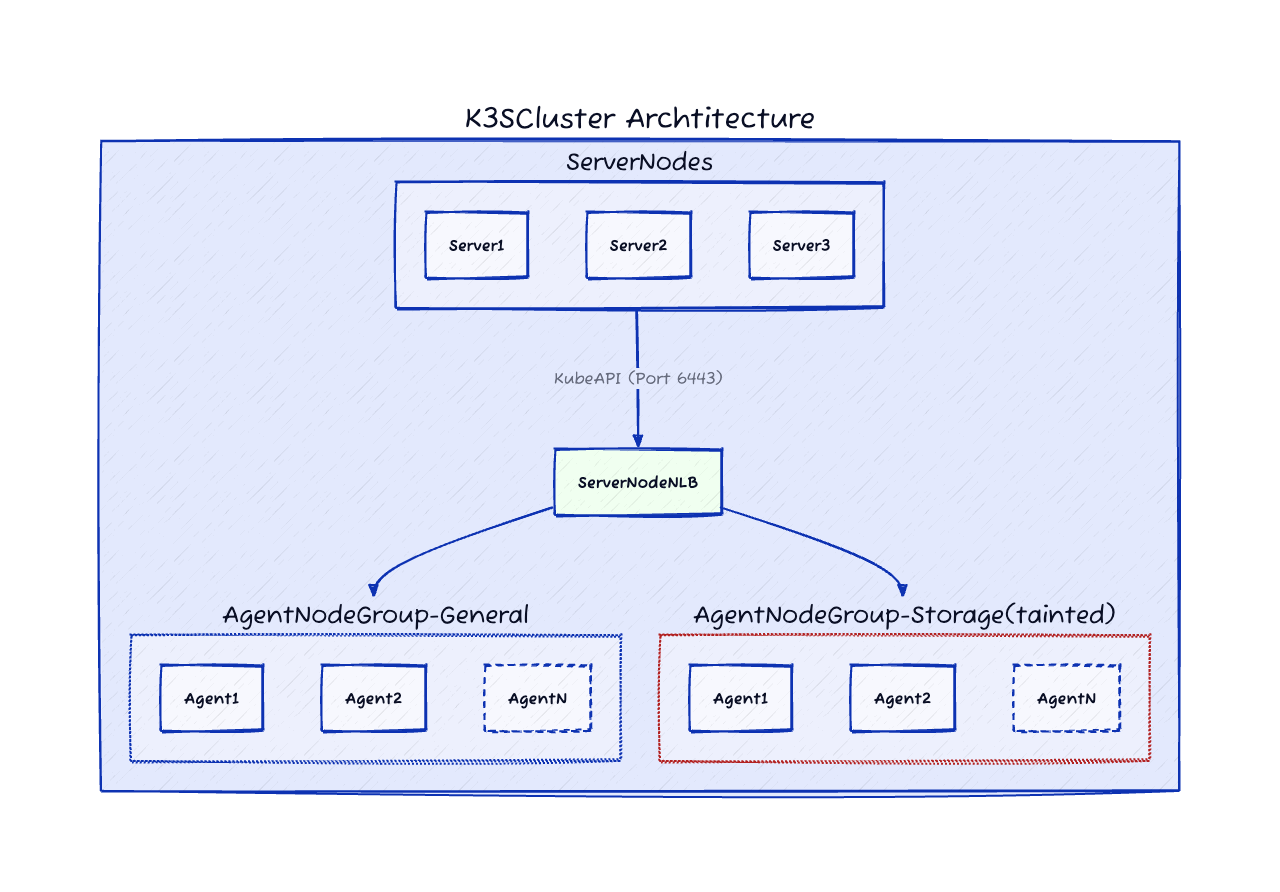
Here is what the high-level infrastructure looks like:
Setting up the K3sCluster
Begin by installing K3s on the primary server and initiate it in cluster mode. This step is crucial as starting K3s in cluster mode automatically generates a token. This token is essential for connecting additional nodes to join the cluster.
Alternatively, you can generate this token in advance and incorporate it into the cluster initialization command. (Refer to the code snippet below for K3S_TOKEN).
A node in K3s can join the cluster as a server or an agent, depending on the configuration in the initialization script.
How to start a K3s server in cluster mode
K3s provides a simple, single-step installation script that allows for the initialization of a server with the option to include extra functionalities tailored to specific needs.
Below is the basic script for initializing the primary server.
curl -sfL https://get.K3s.io | \
    INSTALL_K3S_EXEC="--tls-san ${K3s_server_nlb_dns}" \
    INSTALL_K3S_VERSION=${K3s_server_version} \
    K3S_TOKEN=${K3s_server_token_secret}\
    sh -s - server --cluster-init \
    --kube-apiserver-arg encryption-provider-config=/etc/rancher/K3s/encryption_config.yaml \
    --kubelet-arg="provider-id=aws:///$instanceAz/$instanceId" \
    --kubelet-arg="cloud-provider=external" \
    --node-taint node-role.kubernetes.io/master:NoSchedule \
    --node-taint node-role.kubernetes.io/control-plane:NoSchedule \
    --node-label "topology.kubernetes.io/region=${region}" \
    --node-label "topology.kubernetes.io/zone=${instanceAz}" \
    --write-kubeconfig-mode 644
As you can see from the code snippet above, we have added taints during the K3s cluster initialization to emphasize that these are master nodes. This was achieved using the node-role.kubernetes.io/master:NoSchedule and node-role.kubernetes.io/control-plane:NoSchedule taints for the control plane nodes.
How to start a K3s server in agent mode
The following command initializes the K3s node in agent/worker mode:
curl -sfL https://get.K3s.io | \
INSTALL_K3S_VERSION=${K3s_agent_version} \
INSTALL_K3S_EXEC="agent" \
K3S_TOKEN=$(K3s_server_token_secret)\
sh -s - agent --server https://${K3s_server_nlb_dns}:6443 \
  --kubelet-arg="provider-id=aws:///$instanceAz/$instanceId" \
  --node-label "topology.kubernetes.io/region=${region}" \
  --node-label "topology.kubernetes.io/zone=${instanceAz}" \
  --log /var/log/agent.log
In K3s terminology, "server" refers to master nodes, and "agent" refers to worker nodes.
After the nodes and agents have joined, the resulting output will appear as follows.

According to the designed architecture, there are three server nodes for high availability (HA) and two agent nodes that are capable of auto-scaling.
Toolkit for Efficient K3s Cluster Operations
What other tools do we use to oversee our digital system's structure?
- Access management: Rancher is key for managing who gets access to our system and how they are identified. This tool makes it easier to control permissions. Rancher works with different methods for logging in, and we use OKTA to connect these methods.
- Monitoring and logging: We use Grafana, VictoriaMetrics, and Promtail to keep an eye on our system's health and to record activities and events.
- Storage management: Longhorn helps us manage data storage that needs to stay available and consistent across different situations.
- Secrets management: Hashicorp Vault is where we securely store sensitive information like passwords and keys.
- Security policy enforcement: OPA Gatekeeper checks and enforces rules to make sure our system stays secure.
Lastly, we use Infrastructure as Code (IaC) to set up and manage these tools and environments. Specifically, we use AWS CloudFormation for this purpose.
IaC: The CloudFormation story
AWS CloudFormation stacks
Before starting with CloudFormation, we carefully mapped out our work process on a whiteboard and came up with a deployment strategy.
We isolated the setup using CloudFormation stacks by making use of nested stack sets. This approach allowed for organised and modular infrastructure deployment. We then created and set up the following stack sets sequentially:
- root_stack: Serves as the central hub, connecting all other stacks. It includes both implicit and explicit dependencies. Within this structure, we define the key components below.
- SecurityGroupStack: Pre-provisions all the necessary security groups. We referred to the K3s documentation to establish default firewall rules for basic operations.
- InitServerStack: Initializes the setup of server nodes.
- ServerNodesStack: Manages the provisioning of server nodes.
- AgentNodesStack: Handles the setup for agent nodes.
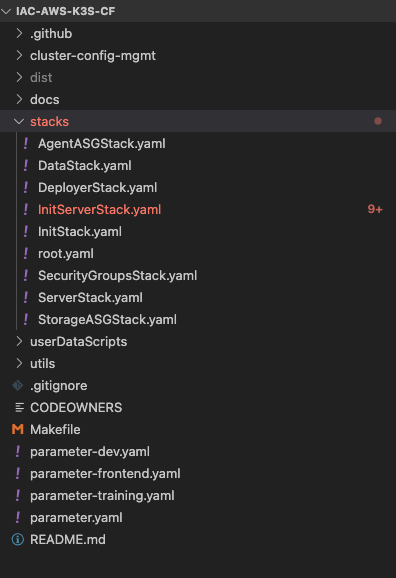
Our deployment script code base looks like this.
Templating engine boosts reusability
To make our CloudFormation scripts reusable and more efficient, we used a templating engine to generate YAML templates.
Our chosen templating engine is Jinja. It takes a `parameter.yaml` file as input, which outlines key cluster details, such as VPC, subnets, autoscaling minimum and maximum constraints, EBS volume size, region, and account ID. We can extend this list based on our requirements.
This approach adds dynamism to our code. For each environment, we create a separate parameter.yaml file, such as parameters-dev.yaml and parameters-prod.yaml. This streamlines the deployment process and allows us to swiftly create new environments.
Python-jinja wrapper
We developed a Python wrapper that uses Jinja to render our CloudFormation scripts. This wrapper allows us to produce customised templates according to the values specified in the `parameter.yaml` file. This method simplifies the creation of tailored infrastructure configurations.
Using AWS Cfn-lint to verify rendered resources
To verify the integrity of the rendered resources, we employed cfn-lint for testing and validating our CloudFormation scripts.
This tool automates the process of syntax checking and error detection. We’ve seamlessly integrated it with Makefile, which in turn activates the `test.sh` script.
Using “make” commands to bootstrap and deploy K3s clusters
After automating the various stages with bash scripts, we streamlined our process into the following key scripts:
- deploy.sh: Deploys the stack to CloudFormation using the AWS CLI.
- test.sh: Executes tests on the stack.
- destroy.sh: Removes the stack from CloudFormation.
- render.sh: Generates YAML files from the `parameter.yaml` input.
To simplify and enhance usability, we used GNU Make to consolidate these commands. This lets us execute tasks with simple commands like `make deploy`, `make destroy`, `make test`, and `make render`, which provides a more intuitive interface for managing our CloudFormation stacks.
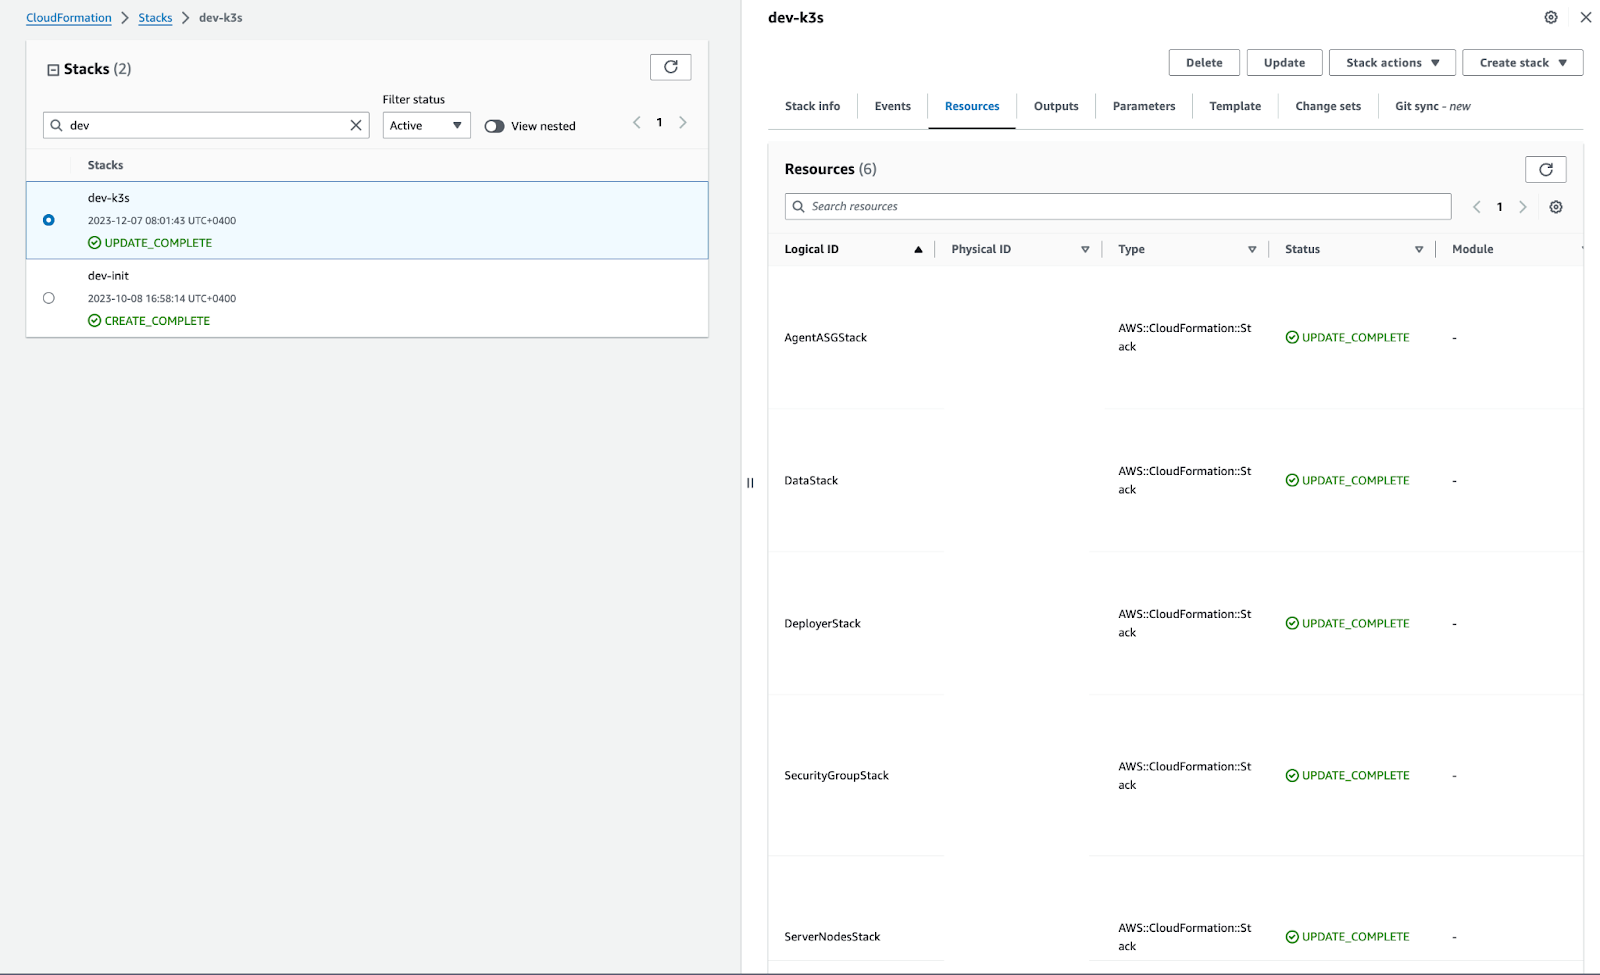
And the provisioned CloudFormation stack will finally look like this:
This is not the final chapter of our journey. In this article, we shared our practical experience with Kubernetes, where we faced many challenges and learned valuable lessons. We gained insights into how to manage, backup, and recover Kubernetes components. This prepared us for the next step of using AWS EKS to manage Kubernetes.
Watch this space for the next stage of our Kubernetes adventure!
About the author
Jothimani Radhakrishnan, a Senior DevOps Engineer at Deriv, has a keen interest in cloud technologies. Besides his engineering role, he is an avid blogger, writing about DevOps, SRE, and Python development.